See her creativity and the tutorial from her blog.
Sunday, June 21, 2009
Dessert Picks
See her creativity and the tutorial from her blog.
Wednesday, June 17, 2009
Felted Hearts


Cupcake keyring


Friday, June 12, 2009
Felt Brown Paper Bag
The Brown Paper Bag
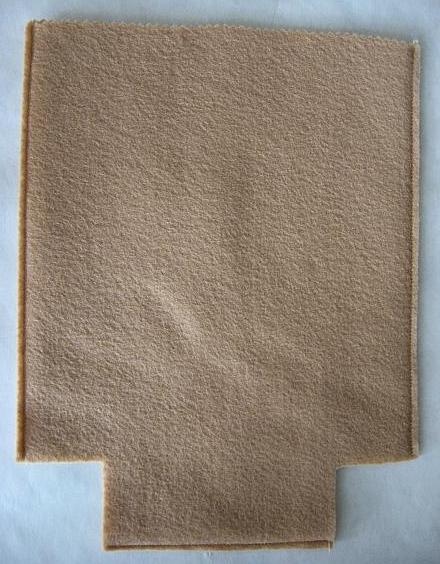
You need two pieces of light brown felt. Cut a square out of the bottom corner on each side. With pinking shears trim across the top. Trim just enough to pink the top. Sew across the bottom and along each side.
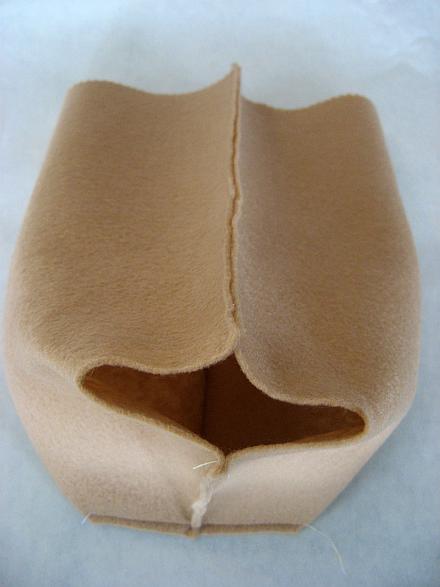
Pinch the side and bottom together and sew.
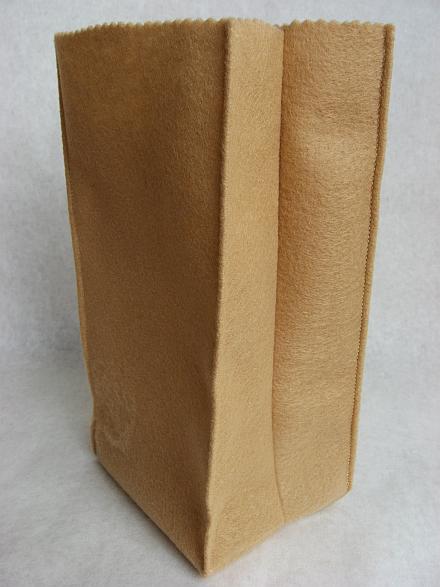
Finished!
needle felted conversation heart
Needle Felted Bear

Form a small ball, shaping the head to form a forehead.

Form ears & attach by poking needle into head

Embroider nose & mouth

Insert glass eyes & you've completed the head

Form the body

Create the legs and feet in one piece

Shape arms

String joint all pieces

Your finished bear!
3 beautiful needle felted teddy bears by Barbara Allen


Needle Felting Tips
Rule #1. There are at least 45 ways to accomplish any one needle felting goal. Okay, that's an exaggeration. But, if you put 45 needle felters in a room together you might get 8 or 10 different ways to accomplish any felting task. There are not really any "right" or "wrong" ways to needle felt. Whatever works is the "right" way for you!
Needle Felting Safety:
1. Felting needles are not merely long, rusty-looking sewing needles! They are sharper and have barbed tips, and the force at which they are used can create an injury far greater than that with the usual use of a sewing needle. GREAT CARE should be used by people of ALL ages while needle felting. While children (even the very young) certainly possess the motor skills to use a felting needle, they lack the consciousness to always keep the needle away from their free hand to avoid being poked or stabbed as they work.
2. Keep your fingers out of harm’s way. When felting ALWAYS place your work on a foam sponge or other similar work surface and poke toward the board, never toward the free hand that is holding the piece steady. DO NOT hold your work in the air and attempt to felt that way. This will lead to stabbing yourself.
About Needling:
1. Felting needles are brittle and can easily break when bent. Always poke the needle straight into the wool, and pull straight out again. Never twist or bend your needle while felting. If you should ever break a needle be sure to locate the tip that has broken off. It’s very sharp and could lead to an injury if left lodged in your piece or lying on the ground.
About Buying Wool:
1. Most wool that is available commercially, either on-line or in local spinning/yarn shops are meant for people who like to spin wool into yarn, with the idea of the final product being something you can knit and, probably, wear as a garment. Thus, most available wool is of a VERY soft, silky sheep breed known as Merino. Merino wool works great for spinning, and even for wet felting. But for needle felting a coarser, scratchier wool actually works best. The barbs on the felting needle need a lot of scales on the individual fibre strands in order to have something to grab, and entangle. Which is how you can get your wool sculpted, shaped and hardened.
The wool I sell in my shop is quite a coarse wool which lends itself to quick felting. Of course, I wouldn't want to wear a jumper made of it but then again, I have no plans to needle felt jumpers!
2. If you are buying on-line and can't feel the wool for yourself, you can always ask the seller to describe the wool to you by comparing it to Merino, or asking if it's soft enough to wear as a jumper.
About Buying Needles and Tools:
1. You could likely live your whole life using just a 38 triangle felting needle and be perfectly happy, if you've got a nice, coarse wool.
2. If you've got some silkier, finer wool, like Corriedale or Merino, then it would be better to use a finer gauge needle, as in a 40 triangle size. Using the finer tipped needle will make your piece felt more quickly (the needle barbs are spaced closer to the tip of the needle than on a 38 gauge) and the size of your needle hole will be much smaller. Meaning, you won't have unsightly, gaping needle holes in your project!
3. If you love to work on miniature sized pieces, like tiny teddies, for instance. Then you don't need anything other than a single felting needle -- maybe one 38 triangle and one 40 triangle.
Individual needle are available on the "Needle Felting Supplies" page of my website
About Handling Wool:
1. As a general rule, do not cut wool with scissors – cut wool is difficult to felt. To separate out pieces of wool to use simply grasp a strip or section of wool between your two hands and gently pull apart. If the wool is not separating easily than slide your hands further apart and pull.
2. Most purchased wool (and all wool bought from Bloomingfelt.co.uk) has been combed (“carded”). This means that a lot of the fibres run in one direction, creating a grain. To separate the wool, pull it apart widthwise, not lengthwise, along the grain.
3. Do not fold or twist the wool as you lay it out on your work surface or as you wrap a wire armature. Folding and twisting make it difficult to create a smooth, even felted surface and twisting, in particular, makes the wool much more difficult to felt. Wool will always felt more easily and quickly if you think in terms of “opening” up the fibres to expose as much surface area as possible.
4. Wool grows AND shrinks while being needle felted. You are starting work with fluffy, airy wool. As you poke it with the needles you start to compress all these fibres, thereby making your fluff into something more dense and compact. But at the same time compressing these fibres tends to cause a “pancake batter” effect – your piece will start to lengthen and flow outward. Flattening and lengthening seem to go hand in hand. Thus, if you are working on a mat or with a pattern you want to leave a little bit of room for your piece to expand/lengthen while also remembering that your piece will flatten and not be as thick once you start the felting.
5. Overfelting. Don’t let this happen to you! Any time you need to attach two felted pieces of wool together they need to have some fluff of fibre available to felt. Wool fibre has tiny scales all over its surface. The entanglement of these scales by the barbed felting needle is what causes your wool to felt together. If you felt the pieces too thoroughly they will be unable to join together since all of the scales of the wool fibre will already be entangled with each other, leaving insufficient scales available for the joining process. If you ever have difficulty attaching overly felted pieces together, try sticking a bit of fluffy, unfelted wool in between the two pieces to give them something to grab on to, sort of like a wool “glue.”
6. Doneness. How do you know when you've needle something long enough? Well, that depends on the purpose/function of the finished piece. If it is going to be a child's toy, especially a young child, then you want your finished piece to be very firmly felted. Rubbing your hand across the surface of the piece you should not be able to move or disturb any of the fibres. And, ideally, you shouldn't be able to leave an indentation if you press on the piece with your thumb. You can still get your finished piece to stand up to child's play if you work it less than perfect, but the closer to really firm you get the better it will be for durability.
If your finished piece is meant to be a wall hanging then you don't need to poke it as thoroughly as you would something that is going to be handled regularly. Poke the piece enough that your fibres don't easily move around and enough that you like the look of the surface area (i.e. really fuzzy and fluffy or really smooth and tight) and you'll probably be happy forever with your piece.
Needle Felted Ladybug

 This ladybug is created by Andrea in year 2001.
- dyed wool
- felting needle
- wool ball for a form
- a pillow or foam pad
I put a folded newspaper under the foam pad I was using, to protect the table and the needle.
2. Here I have started to wrap the wool ball in the red roving. I want to cover the ball completely, and evenly. When I start to felt, the wool will shrink somewhat, so I want to put enough red wool on so that the white ball can't peek through later.
3. Here is how I hold the needle when I am felting. I want to keep my fingers out of the way of the needle at all times. The needles are very sharp and can draw blood if not used carefully.
4. Now I start to felt the ball, by jabbing and poking the needle into it. It is not necessary to imbed the needle up to the hilt. It only has to go in up to the depth of the barbs (usually the bottom 3/8"). I secure the wispy end of the roving first.
5. Keep punching! Here I have needle felted about one quarter of the ball.
6. Another view of the first felted quarter.
7. Continue to needle felt the ball until the red is secured to the form and dense.
8. Now, by intensely felting in one area, we can make a groove length-wise down the "back" of the bug, to create the impression of the wing/shell division.
9. I pull off a piece of black roving and wind it into a ball for the head.
10. Now I start felting it with the needle. Because the head is smaller than the body, it is harder to hold onto and still keep my fingers out of the way of the needle. Be careful! Remember to turn the head as you felt it, so it doesn't stick to the pillow or pad, and so it keeps a roundish shape.
11. By comparing this photo with the last, you can see how the head is beginning to felt down in size.
12. Now I apply it to the body, concentrating the felting on the edges of the head where it meets the body.
13. Another view of the needle as I am attaching the head. I want a very good join on the edges.
14. The ladybug has a head!
15. Now I set the bug aside to start making the "spots". I pull out wisps of black roving, and roll it around my finger.
16. Four "spots" ready to be felted.
17. I felt the spot by punching down into the spot and the pad (or pillow). I pay careful attention to the edges, making sure they are distinct. Sometimes I pull a wisp of wool that sticks out from the edge in towards the spot, and felt it down.
18. When I pull the spot off the pad, the back side is wispy. That is okay, as we will take advantage of that to make a good join to the body.
19. I place the spot fuzzy-side down on the bug body, and start to poke it all over with the needle. Again, I pay special attention to the edges of the spot, so they become tightly felted to the body. I don't want loose spots on my ladybug!
20. I felt the spot all over, to insure a good join, and to make sure the spot is the same density as the body - maybe even a little more dense.
21. Here is a side view of the spot, showing that it is level with the rest of the body, and doesn't stick beyond it.
22. Continue to felt the spots and apply them to the bug. I made four big spots, but you can apply any size or number that appeals to you.
23. Just make sure they are all well-attached.
24. Now, for the "breastplate", I take a wisp of black roving and fold it into a piece that is bigger than the bottom of the bug, to allow extra for the shrinkage.
25. The wispy ends are folded under, and it is ready to felt.
26. I felt down into the wool and the pad.
27. Again, pay careful attention to the shape of your edges, to keep them firm and neat. Watch your fingers!
28. When the breastplate is felted down and the edges neat, apply it to the bottom of the bug.
29. Just as with the head and the spots, the edges are the crucial join areas.
30. Carefully felt around the breastplate, securing the edges all around.
31. You can tug and pull on the black, or push it, to make it meet the imaginary line you visualize between the body and where the breastplate should go.
32. Now, felt all over the breastplate, to secure it and make it dense. Don't poke the needle all the way through the body, though (as pictured), or the black will begin to show where the needle comes out.
33. The breastplate has been fully attached and felted down.
34. Ta-da...A ladybug!
Felt supply 不织布出售 (taking orders now~)
I'm please to announce that I'm providing this service.^^
Measurement: approximately 9" x 12"
Price: RM1.70 per piece (0.55 USD)
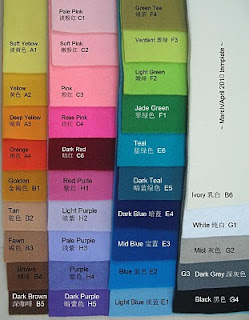
Minimum order is 5 pieces of felt and the colors are as follow:
Click here to view larger picture.
When you place the order, please indicate the number of pieces for each felt color.
看了那么多的不织布手工和教程, 是不是也引起你的兴趣想给自己或朋友做一个? 是不是不知道要到那里购买不织布呢? 呵呵, 这一回你们不用再烦恼啦!! 从今天开始我就提供不织布销售服务, 解决你的烦恼:)
尺寸: 大约 9 X 12 寸
价钱: 一张 RM1.70 (0.55美金)
每次定购最少5 张, 订购时请清楚地例出购买的颜色和张数
颜色名称请参考上面的图画。更清晰的照片请看这里。
P/S: E6 - out of stock E6 - 缺货
Please place your order here. Shipping method please see here.


