Resource: The b-line

Thursday, August 27, 2009
Tuesday, August 25, 2009
Shoulder bag
Resource: tinyhappy
Here's a rough pattern and guide for making a shoulder bag like one of these, as promised. These are really easy to make, and I always have so much fun choosing fabrics and buttons for them. I have to warn you however that i'm not very good at explaining things in words, so I hope you can understand my general meaning in these directions! Please email me if you need further instruction, and I'll be happy to help! I couldn't work out how to do a PDF file so this is a very basic and d-i-y version of a pattern! As you can see, I've drawn a tiny, rough and very much NOT-to-scale outline of the pattern which you will need to draw to the proper measurements yourself on some tracing paper or a piece of newspaper. It doesn't matter if it's not quite right, as long as it's symmetrical. The entire length of the pattern is 28 inches. This will make a bag that's a good size for your wallet, keys and a few books, but it's easy to make it a bit deeper or the strap a bit longer, if you wish. Just add a couple of extra inches. Umm, and that measurement on the strap should say 18". Sorry about that.

Once you've drawn and cut out your pattern, cut two from your chosen bag fabric, and two from your lining fabric. I usually use recycled fabrics- old curtains, blankets, vintage bits and pieces... but you could use anything that takes your fancy. Something fairly sturdy for the outside works best though. After cutting these out, I also cut a pocket for the inside, I use some of the outer fabric for this, cut into a rectangle about 8" X 6.5". Then I cut a strip measuring 5" X 1.5" to make a loop with which to fasten the bag to a button, if you choose to use this method. You could also make two ties to fasten, or use velcro or a snap fastener.
1. Start with your outer bag pieces. Place right sides together, and sew the seams at each edge, between the *s on the pattern, like this:

2. Then open out the piece so that the seams are at the front and back of the bag. Sew along the bottom seam.

3. Then square off the corners by pinching each one out, then sewing straight across about an inch from the corner's edge. Trim excess.

4. Repeat these steps with the lining pieces, but remember to leave a gap in the bottom seam, for turning inside-out later on.

5. Overlock or zig-zag the top edge of your pocket. Press the edge down about half an inch, and top-stitch. Then press your pocket half an inch all around. Pin to the outside of the lining where you would like it, and stitch it down.

6. Make your loop for the button. Press in both edges of the strip towards the centre, then fold in half and press again. Sew the edges together (this is just like a bias strip.)

7. Now sew the lining and outer pieces together. Place one inside the other, right sides together. Match centre seams, and pin. Insert your loop between the two layers on one side of the bag, so the ends of the loop are sticking out, and pin it securely.

8. Sew about 1/4" from the edge, all along both sides of the bag, right up to the top edges.

9. Now clip like mad around the curved edges, nearly to the seam.

10. Turn the bag right-way-out through the gap in the lining. Now press all around the edges of the bag where you have sewn, so that both layers 'sit' nicely. Trim the tops of the straps so they're even and of equal length.

11. Sew the top of the strap together- at just the outer pieces. Place right sides together, and sew a 1/4" seam. (This is a bit fiddly under the machine, but it's okay.) Press down. Then tuck in the lining pieces at this point and hand-stitch it closed.

9. Press the strap again and if you are happy with everything, top-stitch a 1/4" seam all around the edges of the bag. Hand-sew the gap in the lining closed. And hand-sew a big button on the front of the bag, in such a position so the loop will fit nicely around it.

10. Ta Da! Enjoy your new bag!
Fabric Box tutorial
I didn’t forget about you ladies. We’ve just had a lot going on.
Added: info to step 3.
Disclaimer: I’m not the best at following directions, including patterns. I sort of just dig in and work it out as I’m going. I’m sure there is probably a more professional way to go about this style of box but this is how I made it. So forgive me, if it’s a little confusing. I will try my best to make some sense out of all this. If you have any questions just let me know. With that said, let’s do it. And please do share with me, if any of you craft up some of these cute containers.
 Â
Â
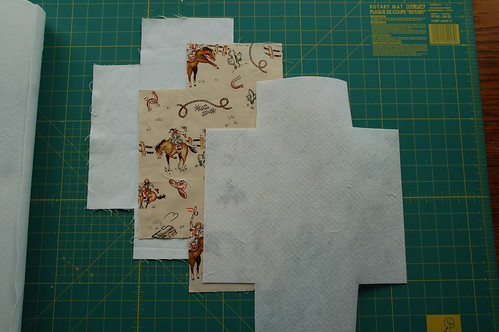
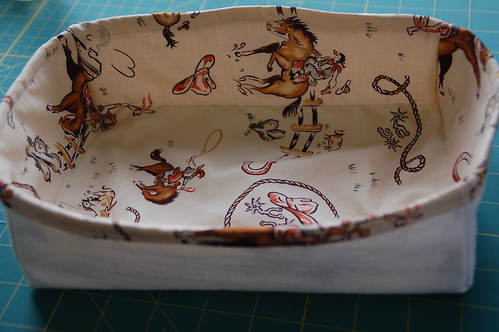
1) First decided what size of a container you want. This one will be 6″ X 9″. I went ahead an drew my pattern on the wrong side of the outside fabric. You can also just use a pattern you made out of paper. If your box is to be 6″ X 9″ make sure to add a 1/4″ to it. So my rectangle was 6 1/4″ by 9 1/4″. Then once you have the rectangle or square drew, then add the 4 side flaps. These will be your side walls. These are 3 1/4″ for a finished side of about 3″ tall. And when your done you will have a piece of outside fabric that looks similar to that in the above picture.
2) Now cut out your inside linning fabric. I use my first piece of fabric as a pattern. Trace it. Then add about a 1/4″ to a 1/2″ to the length of each of the 4 flaps. So it will make them a bit longer than the outside lining was. If you are wanting a larger amount of lining to over lap the edge of your finished box, then add more. This can be alter to what ever you want. More or Less over hang.
3) Now you need to cut another piece out of firm stabilizer. Use your first piece or paper pattern again. But this time cut about 1/2′ off of the 4 flaps. You don’t need the stabilizer to go all the way to the edges as you will be turning it down. Added: In the first fabric box I made I did not cut a 1/4″ off of the flaps sides (the V corners) but with this one I did. You can see in the picture of me sewing up the corners that the stabilizer is a little smaller than the inside lining fabric.  I’m not sure which is the best way if it matters. I will have to make a few more to see which way is the best way.
Confused yet? You should have 3 pieces now. The outside fabric that is close to your finished size. The inside lining fabric that has longer flaps than the outside fabric and stabilizer that has shorter flaps than the outside fabric.
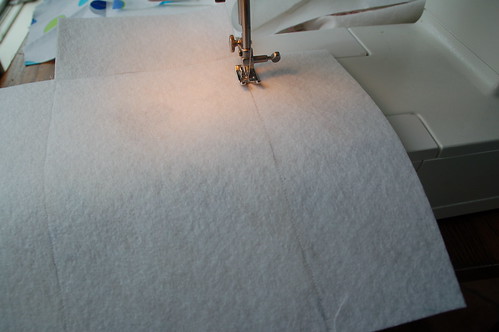
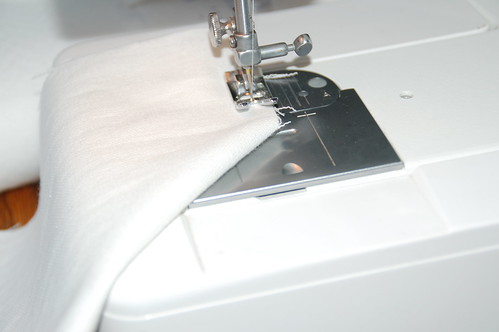
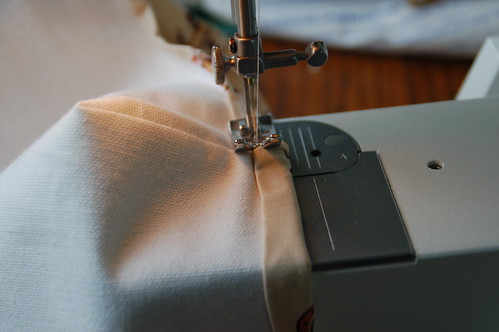
4) Now take your inside lining fabric and attach the stabilizer to the wrong side of the lining fabric. If you have the iron on kind, do that. I didn’t so I had to sew it on as well as help make the shape of the box bottom. Sew along where the box bottom dimensions are. See the picture below. Leaving the 4 side flaps alone. Make sure to keep the fabric nice and tight or you will end up with loose and wavey fabric like I did. I had a good excuse as I was having a very import conversation with a toddler that just had to help. It’s ok as this box is staying her with a horse loving girl.
 Â
Â
On to the corners…..
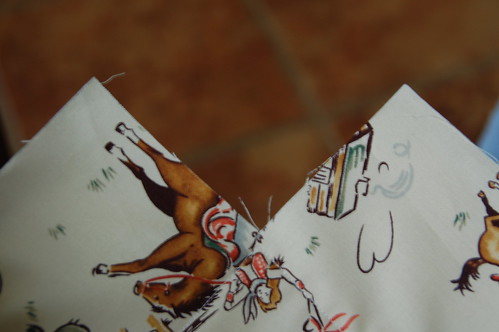
5) Now start turning it into a box shape. You take your inside lining fabric that has the stabilizer attached to it and put right sides together on the corners and sew them together (pic below). Do this to all 4 corners.
You will end up with up this.
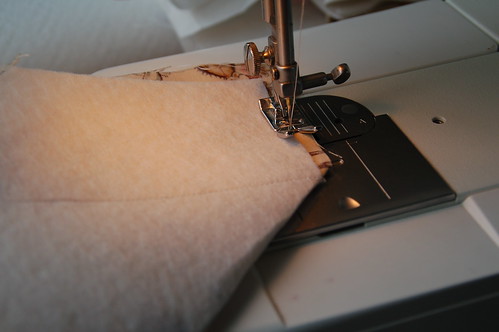
6) Now on to the ouside fabric. If you are wanting to embellish it or embroidery it, probably should do it now before sewing it up. Do the same thing with this piece of fabric as you just did with the lining. Corners Right sides together, sew them up. All 4 of them.When you are done. Turn it right sides out.Â
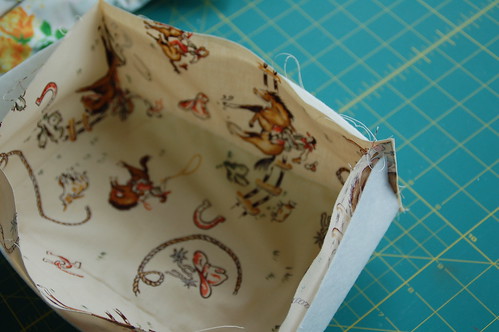
7) Take the lining box you made and place it inside the outside fabirc box that has the right sides out.  Work it around, there should be inside lining evenly sticking up above the outside fabric. Once you are happy with it. Pin it in place.
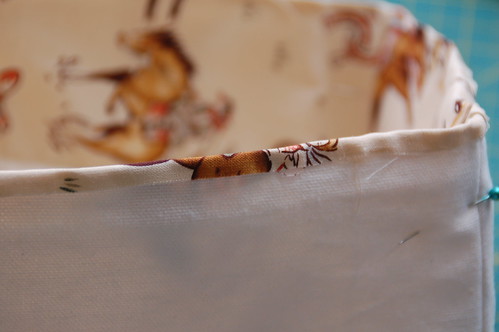
![]() You can turn it down once and sew it.  I didn’t want to see 2 seams so I turned mine down about a 1/4″ and glued it, using Fabric-Tac.  If you didn’t want to use glue because you will be sewing through this, you could opt for the iron on fusible web.Â
You can turn it down once and sew it.  I didn’t want to see 2 seams so I turned mine down about a 1/4″ and glued it, using Fabric-Tac.  If you didn’t want to use glue because you will be sewing through this, you could opt for the iron on fusible web.Â
 Â
Â
If you do use glue make sure it is completely dry before going on to the next step. And make sure to glue the corners nicely.
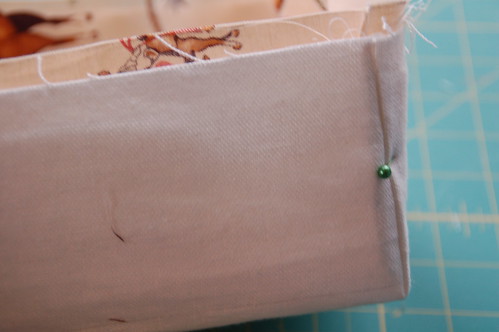
9)Turn it down on more time. How ever much you like. Sew it completely around like pictured below.
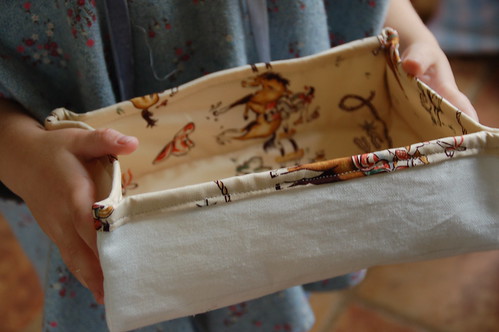
Now you have your box.
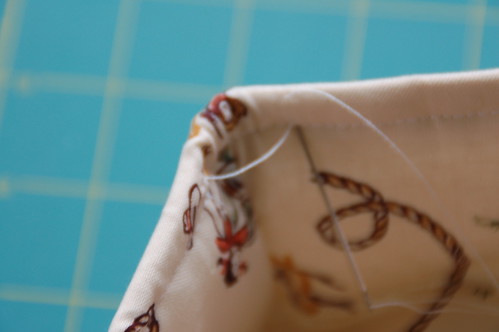
10)You can leave it like this or tighten up the sides, by sewing them like the picture below. Pinch the corners together to see where they meet and sew it up nice and tight. Using embroidery floss or a double thread is best.
And your finished and have a cute box to fill with goodies.
Flat Fold Gift Boxes
Resource: A Necessary Creativity
WHAT YOU WILL NEED: For a 3″ x 3″ box
Decorative card stock (sturdy double sided ) cut to 10.5″ x 3 1/8″ (I used Parisian Breeze specialty dp from Stampin’ Up!)
Coordinating card stock (for inner box body) Cut to 6″ x 6″
Strong small magnets (Basic Grey magnetic snaps work well)
Adhesive

STEP 1: Score your 10.5″ decorative paper at 1.5″, 4.5″, 6″, and 9″ so it can fold as shown above.
STEP 2: Score your 6″ x 6″ card stock at 1.5″ in on all four sides.

STEP 3: Fold two side in to meet at the middle, as shown above.
STEP 4: Score the four corners on the diagonal, as shown above.

STEP5: Crease all scored lines well for easy folding.

STEP 6: With long decorative paper laying flat (the side that you choose as the inside of your box facing up), place and adhere the inner box on top, lining it up just inside the the bottom edge. The score lines on both pieces will line up perfectly. See photo above.

STEP 7: Once the two pieces are adhered together, open the folded edges and apply adhesive only to the outer four corners, as shown above. Close in the edges again to adhere well.
The magnet should be adhered to the center bottom (between the glued corners). The other magnet should be adhered to the top center flap. Sorry, no picture of this, but I think you get the idea. The top flap magnet is concealed behind the ribbon in the photo below.


You can make 2.5″ x 2.5″ boxes by simply using DP cut to 8 3/4″ x 2 5/8″. Scored at 1 1/4″, 3 3/4″, 5, and 7 1/2″. The inner box piece would be 5″ x 5″. Scored at 1 1/4″ on all four sides.
I hope you enjoyed the tutorial. I tried to make this as clear and concise as possible. If you have any questions, feel free to ask!
Have a creative day and see you again soon!!
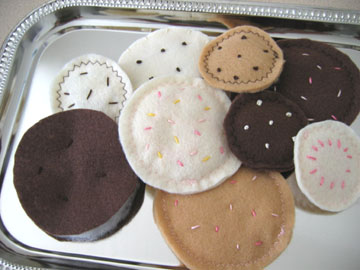
Felt Sugar Cookies
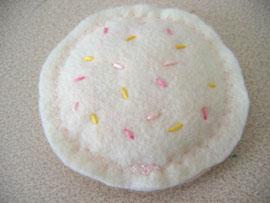
These dainty little treats are a hit in the kitchen, a play kitchen that is. My kids puts these on a small tray I bought at the dollar store and bring them to us to taste. Follow my how-to for these fun Felt Sugar Cookies.
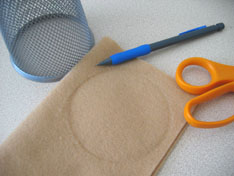
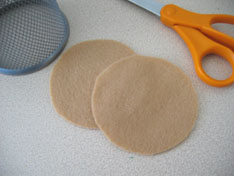
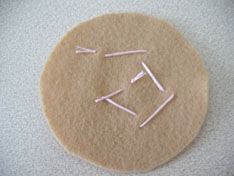
First, you will need felt, embroidery thread, needle, and batting. Using a glass or cup, trace a circle onto your felt. Make it at least 2-3 inches across, you can always trim later. Double up the felt and cut out 2 circles at once.
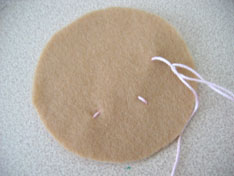
Get out the colors of embroidery thread for the colors of sprinkles you want your cookie to have. Thread your needle and make a knot at one end. Using only the top circle, go up and down throughout the felt to make the look of small little sprinkles. Simply tie a second knot on the back of the felt when you are done.
Cut or pull out some batting to make the middle of your cookie. Not too much. You don’t want your cookies to look too puffy. Place the batting between the felt circles. You want at least 2-3 centimeters in from the cookie without batting.


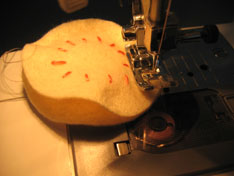
Now you can sew around the cookie. You can use a sewing machine on a zigzag setting as I have done, or you can stitch a blanket stitch around the cookie for an even more homemade cookie look.
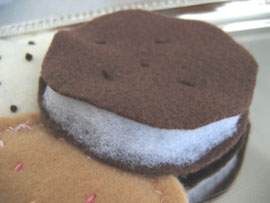
Then I did this one as an Oreo cookie and only stitched the two felt pieces together through the batting. I didn’t sew the edges.
Bears in waistcoats

Bears in waistcoats
Peekaboo! These cute, cheeky bear necessities are simple enough for children to enjoy sewing, and they're also quick to make for craft fairs or stocking fillers. Create them in your favourite colours.
Click for templates (bear should be approximately 8-1/4 in/21 cm high)
Materials
- Felt: two 30 x 15 cm (12 x 6 in) pieces for body of each bear
- Felt scraps for muzzle and waistcoat
- Black seed beads for eyes
- Black embroidery silk for facial features
- Toy stuffing
Note: The seam allowance throughout is 3 mm (1/8 in).
Body
- With right sides together, pin the front body to the back body. Stitch around the bear, leaving a gap at the side between the dots.
- Trim about 2 mm (1/16 in) from the seam.
- Stuff the bear, packing the stuffing into the ears, arms, and legs. Turn the seam allowance around the gap to the inside and slipstitch the gap to close it.
Face
- Place the muzzle on the face and whipstitch the edges, leaving a small gap. Stuff lightly through the gap, and then complete the sewing around the muzzle.
- With three strands of embroidery silk, satin stitch the nose and sew lines for the mouth. Take the needle and thread up through the back of the muzzle and bring it out at the position of one of the eyes. Sew on a bead securely. Repeat for the other eye.
- To accentuate the shape of the bear's head, stitch around the outline of the head, through all layers, about 3 mm (1/8 in) from the edge and across the bottom of the face. Use a thread in the same colour as the felt, and a running stitch. Stitch another line across the base of the ears.
Waistcoat
- Butt the side seam edges of the waistcoat against each other and whipstitch together. (If you wish, you could decorate the waistcoat with beads or felt motifs.)
Furry Friends Bookmarks
Resource: Fave Crafts

Kids can mark their place in their favorite stories with these furry, felt bookmarks. Younger kids may need adult supervision when cutting out the shapes.
by Robin Tarnoff for Glue Dots.com
Materials:
- Craft Glue Dots
- Mini Glue Dots
- Felt in various colors, (Easy Felt)
- 8 mm wiggle eyes
- Scissors
Steps:
- Click to open and print the bookmark patterns.
- Cut the shapes from the felt.
- Attach the spots to the body and ears using Craft Glue Dots.
- Attach the nose to the face and the face to the body and the ears to the face with Craft Glue Dots.
- Attach the eyes to the face with Mini Glue Dots.
- Attach the bow tie to using Craft Glue Dots.
Resource: Imagine Fabric

Today we'll show you step-by-step on how to make a fabric coffee sleeve. It is a wonderful project that can be done in one afternoon and the fabric coffee sleeve makes a great gift. A fabric coffee sleeve is reusable, washable and environmentally friendly. Furthermore, you need only a little bit of scrap fabric. That's as good as it gets!

If you don't drink coffee, then use it as a tea sleeve. Who does not like to drink their tea without burning their hand?
First of all, save your next paper sleeve that you get with your daily morning coffee. Use the coffee paper sleeve as your "pattern".

Add 1/4 inch to your pattern for seam allowance.

Cut out your paper pattern. Use it to trace the coffee sleeve pattern on to your desired fabric and cut two fabric pieces. In this case, I used a beautiful Moda fabric polka dot design from the Bistro fabric collection (we are unfortunately sold out of this design and collection).

Place the two fabric pieces right side together. Start to sew along the top (long) edge of the sleeve leaving 1/4 inch at the front and back of the edge in addition to leaving a 1/4 inch seam allowance. Then sew along the bottom / short edge of the sleeve leaving about 2 inches at the front and back of the edge in addition to leaving a 1/4 inch seam allowance. See below picture.

Now turn the fabric sleeve right side out.

Now sew the sides of the sleeve together leaving a 1/4 inch seam allowance.

Once you have stitch the sides together, you are almost done.

You just need to top stitch at the opening that we used to turn the sleeve inside out. Voila, another fabric project completed successfully.

Subscribe to:
Posts (Atom)
Felt supply 不织布出售 (taking orders now~)
After seeing so many felt handcraft and you wish to make some for yourself and friends but do not know where to get the felt supply?!
I'm please to announce that I'm providing this service.^^
Measurement: approximately 9" x 12"
Price: RM1.70 per piece (0.55 USD)
Minimum order is 5 pieces of felt and the colors are as follow:

Click here to view larger picture.
When you place the order, please indicate the number of pieces for each felt color.
看了那么多的不织布手工和教程, 是不是也引起你的兴趣想给自己或朋友做一个? 是不是不知道要到那里购买不织布呢? 呵呵, 这一回你们不用再烦恼啦!! 从今天开始我就提供不织布销售服务, 解决你的烦恼:)
尺寸: 大约 9 X 12 寸
价钱: 一张 RM1.70 (0.55美金)
每次定购最少5 张, 订购时请清楚地例出购买的颜色和张数
颜色名称请参考上面的图画。更清晰的照片请看这里。
P/S: E6 - out of stock E6 - 缺货
Please place your order here. Shipping method please see here.
I'm please to announce that I'm providing this service.^^
Measurement: approximately 9" x 12"
Price: RM1.70 per piece (0.55 USD)
Minimum order is 5 pieces of felt and the colors are as follow:
Click here to view larger picture.
When you place the order, please indicate the number of pieces for each felt color.
看了那么多的不织布手工和教程, 是不是也引起你的兴趣想给自己或朋友做一个? 是不是不知道要到那里购买不织布呢? 呵呵, 这一回你们不用再烦恼啦!! 从今天开始我就提供不织布销售服务, 解决你的烦恼:)
尺寸: 大约 9 X 12 寸
价钱: 一张 RM1.70 (0.55美金)
每次定购最少5 张, 订购时请清楚地例出购买的颜色和张数
颜色名称请参考上面的图画。更清晰的照片请看这里。
P/S: E6 - out of stock E6 - 缺货
Please place your order here. Shipping method please see here.