Tuesday, July 28, 2009
Saturday, July 11, 2009
Molly's Sketchbook: Woven Felt Placemats
Resource from Purl Bee.
 Handmade placemats are a great way to add some color and a unique touch to your table. I wanted to create a modern set that would work well for outdoor dining in the summer that would also be easy to make. These woven felt placemats require no sewing so they can be a fun all-family project!
Materials

These materials will make a set of six 11-inch x 17-inch place mats:
- Six 18-inch x 18-inch pieces of Ecru Wool Flannel (color of 91)
- Two Wool Felt Bundles. I used Spring but any of the bundles could be beautiful. The bundles pictured above are, clockwise from top left: Spring, Dahila, Water, and Spice.
- OK-To-Wash-It Fabric Glue
- water soluble fabric marker
Finished Measurements
11-inches wide x 17-inches long
Cutting

Cut each of the ecru felt pieces to be 12-inches x 17-inches (you'll be cutting the width down to 11-inches in the last cutting step).
Cut all of the green felt pieces into as many 12-inch x 1-inch strips as you can (make sure you have at least 84 strips total.) Each of the green felt pieces is 12-inches by 8-inches to begin with so cut them lengthwise.

Mark and cut one of the ecru pieces with a water soluble fabric marker as follows:
- Arrange the ecru felt piece with its long sides going vertically.
- Mark a line 1-inch from the top and bottom edges.
- Mark a line, 1-inch from the left hand side of the piece, starting and ending at the top and bottom markings.
- Make another vertical mark 1-inch to the right of the previous vertical mark. Repeat this step until you have 10 vertical markings.
- Trim the piece 1-inch to the right of your tenth and last vertical marking, all the way from bottom to top with your rotary cutter, this will ensure that your placemat is exactly 11-inches wide.

Using a rotary cutter cut along all 10 of your vertical marks. Start and end your cuts a little shy of the horizontal markings being careful not to cut beyond the horizontal marks.

Using a pair of scissors cut the vertical slices so that they meet up exactly with the horizontal markings.
Weaving
Pick out 14 of the green strips and arrange them in a pleasing spectrum. Make sure to use at least one of each of the 8 colors.

Flip the ecru felt piece over so the markings are hidden.
Take the first of your 14 green strips and weave it over and under the vertical slices of the ecru piece starting at the bottom of the ecru piece.

Pull the first strip down as far as it will go along the vertical slices and make sure it lays flat. The strip should go beyond the left and right sides of the ecru felt by a little bit.
Weave the second 1-inch strip of green felt through the vertical slices of the ecru felt directly above the first green strip but in the opposite way, going under and then over.
When you are done weaving the second strip pull it towards the first one so they are flush and both laying flat.
Repeat this weaving with the green felt strips until only one strip remains.

It may seem like there is no room for the last strip but it will fit if you pull all of the previous strips downward a bit, one at a time, staring from the bottom of your work. Once you get to the top of the work there should be enough room for the last piece to fit in like a glove.

Once all the pieces are woven together make any last minute adjustments to straighten the piece.
Finishing

Put a healthy dollop of glue at each end of the green strips and press down.
Let the place mat dry and make sure all of the strips are firmly glued down. Sometimes it takes two rounds of gluing to secure the strips firmly.

Once the placemat is totally dry and secured trim the ends of the green strips.

If the placemat is a little wobly on the sides feel free to trim the sides slightly with your rotary cutter to straighten it.
Repeat for the remaining five place mats and enjoy! (You may want to spray each of them with a stain repellent before using them.)
Wednesday, July 8, 2009
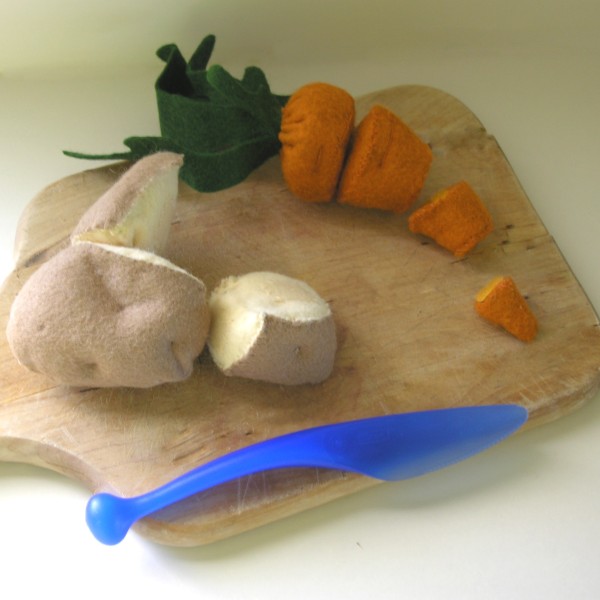
Cut Apart Felt Food Carrot,

What’s more fun than play veggies ready for slicing?
Besides a barrel of monkeys, which actually just sound dirty and loud to me but to each his own I guess… where was I… oh yeah veggies.
Here as promised is the felt carrot tutorial. You can do this with any felt food you’d like you’ll just need to modify the pattern by cutting it into smaller pieces and creating a Hook and Loop or Velcro inside. American Felt and Craft now stocks 16 different colors to match with nearly anything you can dream up.
Keep in mind that most quality Velcro (aka hook and loop) is very strong so for the sake of your pieces posterity I would recommend “cutting” pieces apart with a plastic, wooden, or even felt knife rather than pulling on them. The little blue knife from Ikea pictured above is perfect for this.
For this project you will need:
1 sheet Sweet Potato, or orange colored felt (will make 2 carrots)
1 sheet Fresh Cut Grass or dark green felt (will make 2 carrots)
Stuffing, I used 100% wool legacy stuffing but any stuffing will do
1 6inch strip of colored hook and loop in Fresh Squeezed. (will make 2 carrots with quite a bit left over.)
Thread to match orange colored felt.
If you need help with stitches please refer to Putting it all together
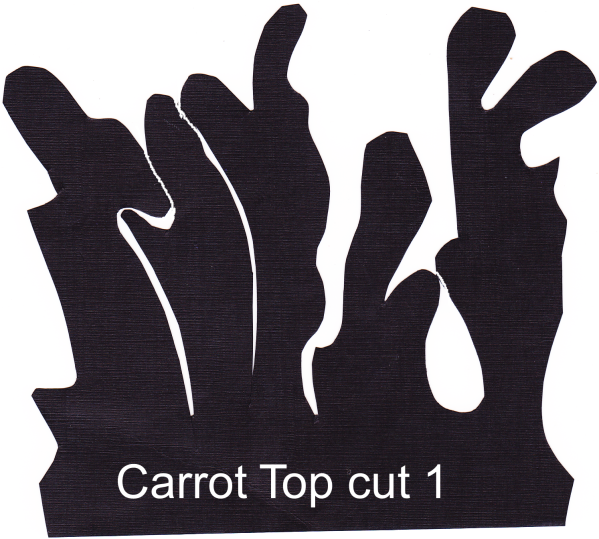
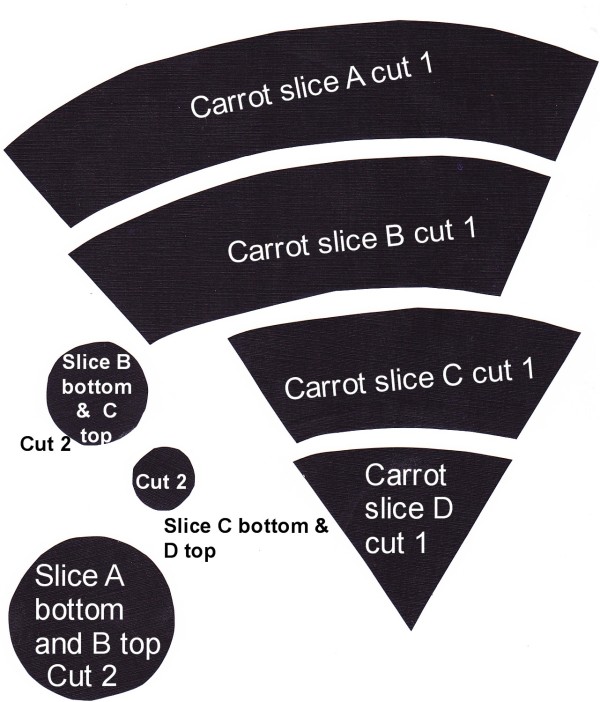
Step 1 cut pieces from templates,

Cut 1 carrot top from fresh cut grass felt.
Cut everything else from Sweet Potato color

Step 2.
Roll stem up stem piece and stitch up as shown, stitching can be done with any color thread, it won’t show.

Step 3
Cut Hook and Loop (aka Velcro) into small circles, obviously you won’t be using this color.

Step 4.
Match up rounds you have cut out, you should have two of each place scratchy side (hook) onto one of the pieces and soft side (loop) to matching piece, stitch into place as shown. Make sure the right pieces fit together, it will be hard to correct later.

Step 5. Sew up sides of rings using a running stitch as shown below, turn inside out so seam doesn’t show

Step 6.
Sew bottom to slice A, the dot represents Hook and Loop (Velcro).
Depending on how far in you made your seam on each carrot ring the bottom and top circles may need to be trimmed a bit to fit properly.

Step 7
Set up like a cup and gather stitch around and lightly stuff.

Step 8.
Place stem into carrot and pull gather stitches tightly, pass needle through the stem a few times to hold it into place, the top is done.

Step 9
Sew tops and bottoms on to remaining rings as specified above. Stick Hook and Loop (Velcro) sides together and Viola! A felt carrot!

OPTIONAL:
To create, carrot “dents” make a large running stitch in side of finished slice, Hiding knot in the seam. Come up through top seam, pull tightly and knot. Repeat as desired.

~Andie
Tuesday, July 7, 2009
Molly's Sketchbook: Felt Aquarium Magnets
Please click here for resource.
This set of 20 sea creature felt-covered magnets makes a great gift for a child or an adult who loves the ocean. The tiny magnet inside each creature is super powerful which makes this a really useful present, a whimsical take on a bulletin board.
Materials

To make 20 magnets:
- Wool Felt Bundle in Dahlia
- 1 piece of Wool Felt in each of the following colors: Black, Ecru, Lime, and Turquoise
- Embroidery Thread in colors to match the felt
- Two 10-piece packages of 8mm Super Magnets (20 magnets total). You can find them here (they are the third item from the top, all the way to the left)
- One 15 x 15-inch light blue magnetic board available online here
- Download and print Felt Aquarium Magnets Template here
Tips for all Magnets

These magnets are all very simple to put together and don't require any fancy embroidery or techniques. However there are a few rules of thumb for all the magnets:
- First cut out the paper template of the shape and then trace it onto the felt as shown above.
- The magnets I suggest above are amazingly strong, which is great, but it means you'll want to put them inside of the shape you're sewing up at the few stitches before you sew the shape closed, otherwise they will stick to your needle.
- Make sure all of your sewing knots are on the back.
- All of the sewing in this project is done with a small running stitch using embroidery thread to match the felt, unless otherwise noted.
Please follow the instructions and diagrams below to put together all the different aquatic creatures.
Clownfish

Finished size: 1 1/2-inches wide
- Cut out the pieces. You will have: 2 fish pieces in one color and 3 stripe pieces in a contrasting color.
- Place and sew the stripe pieces on to a fish piece as shown above.
- Sew both of the fish pieces right sides facing out with the magnet in-between the layers thus encasing the magnet. When you get to the stripes sew underneath them so the orange stitches do not show through on the stripes.
Sea Anemone

Finished size: 1 1/4-inches tall
- Cut out the pieces. You will have: 2 base pieces in one color and 1 ring piece in a contrasting color.
- Tie a French knot in the middle of one of the base shapes using a contrasting color of embroidery thread as shown above. Click here for an explanation of how to tie a French knot.
- Sew the base pieces together with the magnet in-between the layers thus encasing the magnet.
- Cut notches from outside of the ring shape until it resembles a pom pom or flower shape, as shown above.
- Sew the ring onto the base around the inner circle of the ring (you will also be sewing around the magnet on the inside of the base.
Angelfish

Finished size: 1 3/4-inches wide
- Cut out the pieces. You will have: 2 fish pieces in one color and 2 stripes in a contrasting color.
- Sew the stripes to one of the fish pieces as shown above.
- Sew both fish pieces right sides facing out with the magnet in-between the layers thus encasing the magnet.
Coral and Urchins

Finished size: 1 3/4-inches tall
- Cut out the pieces. You will have: 2 coral pieces in one color, 1 small urchin piece in a contrasting color, and 1 large urchin piece in a third color.
- Sew together the two coral pieces with the magnet in-between the layers thus encasing the magnet.
- Cut notches all along the curved sides on both of the urchin pieces.
- Sew the urchins to the bottom of the coral.
Jellyfish

Finished size: 1 3/4-inches tall
- Cut out the pieces. You will have: 2 body pieces in one color and 1 tentacle piece in a contrasting color.
- Sew the body pieces together with the top section of the tentacle piece and the magnet in-between the layers thus encasing the magnet and the tentacles.
Lemon Butterflyfish

Finished size: 1 3/4-inches wide
- Cut the pieces. You will have: 2 fish pieces in one color and 1 spot marking in a contrasting color.
- Sew the spot marking to the front of one of the fish pieces.
- Sew the two fish pieces together with th e magnet in-between the layers thus encasing the magnet.
Parrotfish

Finished size: 2 1/4-inches wide
- Cut out the pieces. You will have: 2 fish pieces in one color and 1 fin piece in a contrasting color.
- Sew the fin on towards the middle of one of the fish pieces.
- Starting from the bottom fin curve of the fish shape, sew the two fish pieces right sides facing out using a contrasting thread color, ending at the top fin curve. Sew over the fin curves with the contrasting thread using a big running stitch to highlight the fins.
- Stick the magnet into the fish shape and sew the head of the fish shape shut using a matching embroidery thread.
Sea Star

Finished size: 1 3/4-inches wide
- Cut out the pieces. You will have: 2 star pieces.
- Sew both star pieces right sides facing out with the magnet in-between the layers thus encasing the magnet. Instead of using a running stitch sew it together using French knots. Click here for an explanation of how to do French knots.
Threadfin Butterflyfish

Finished size: 2 1/4-inches wide
- Cut out the pieces. You will have: 2 fish pieces in one color, 3 fin pieces in a contrasting color, and 1 dot marking in a third color.
- Place the fish pieces together and place the fin pieces on top of them. Sew the fin pieces on through both fish pieces.
- Sew the front of the fish pieces together with the magnet in-between the layers thus encasing the magnet.
- Sew on the dot marking through the top fin.
All Done!

Once you've made all the magnets it's really fun to pose them on the magnetic board!
Drawstring Bag
We made this simple drawstring bag to hold colorful felt jelly bean bags, but it can be used for a wide range of things. A custom gift wrap alternative, a travel bag, a knitting project bag and the list goes on and on. It sews up in less than an hour and works with any kind of fabric. A perfect use for those fabric scraps you've been wondering what to do with.
If you'd like to make some of the cute felt "jelly beans" pictured above you can find the Bag of Beans Project Journal here.
Materials
- 1/2-yard Seven Islands Tulip damask upholstery weight fabric
- Carta Inc. alphabet brocaded ribbon in two letters
- 45mm Rotary cutter
- Straight pins
- 100% Cotton thread that blends with chosen fabric color
- Non-slip Ruler
Cut
Using your rotary cutter and non-slip rulers, cut a 13-inch wide by 26-inch long piece of fabric. For more help with this step, please see our Rotary Cutting tutorial.
Fold the piece in half the long way with right sides together to make a 13-inch square.
Sew
Starting at the fold, sew up the left and right side of the bag with a 1/4-inch seam allowance. Stop 2-inches from the top on each side.
Drawstring channel
Working on only one half of the bag at a time, *fold and iron a 1/4-inch hem on the 2-inch portion of the fabric where you did not sew the seam (on the left and right sides).

Fold and iron a 1/4-inch hem along the top of the bag.

Fold it over another 3/4-inch as if to make a hem and iron (this will be the drawstring channel).

Sew along the bottom edge of the hem with a 1/6-inch seam allowance.
Repeat from * for the other half of the bag.
Make Gusset

Fold both corners of the bag so that the side seam of the bag is running exactly down the middle of the corner point. (Note: You will be sewing your gusset seam exactly perpendicular to the side seam.) You will want both gussets seams to be sewn at the exact same angle so that the gusset isn't askew.

Line up one side of your non-slip ruler with the drawstring channel edge. Using your water soluble marker, draw a line approximately 2-inches down from the point of the corner. Repeat on other corner making sure your marks line up with the first corner.

Sew along the marker lines. Cut off the fabric corners below the seam to reduce bulk. Turn the bag right side out.
Thread ribbon through channel
Attach a large safety pin to the end of one of your alphabet ribbons.

Thread it through the drawstring channel on one side of the bag and then back around the other side so that you have both ends of the ribbon on one side. Repeat with the other ribbon starting on the opposite side of the bag. Leaving approximately 6-inches of the ribbon on either side, tie the ends in a knot and cut off excess.

The bag will cinch when you hold the knots on either side of the bag and pull outwards.
Enjoy!
Resource: purlbee.com
Felt supply 不织布出售 (taking orders now~)
I'm please to announce that I'm providing this service.^^
Measurement: approximately 9" x 12"
Price: RM1.70 per piece (0.55 USD)
Minimum order is 5 pieces of felt and the colors are as follow:
Click here to view larger picture.
When you place the order, please indicate the number of pieces for each felt color.
看了那么多的不织布手工和教程, 是不是也引起你的兴趣想给自己或朋友做一个? 是不是不知道要到那里购买不织布呢? 呵呵, 这一回你们不用再烦恼啦!! 从今天开始我就提供不织布销售服务, 解决你的烦恼:)
尺寸: 大约 9 X 12 寸
价钱: 一张 RM1.70 (0.55美金)
每次定购最少5 张, 订购时请清楚地例出购买的颜色和张数
颜色名称请参考上面的图画。更清晰的照片请看这里。
P/S: E6 - out of stock E6 - 缺货
Please place your order here. Shipping method please see here.

